soncep

  • *
  • 7
Setting Up Heli with CC3D from Scratch.
« on: January 02, 2016, 09:19:06 pm »
    ***  Please disconnect all 3 wires from your ESC before you start this procedure...  I love to watch fail videos, but it would a shame it's because of this set of instructions...
    ***  Please, if you crash your helicopter because of theses instructions and feel you need blame me. 1st, don't blame me, 2nd, go buy a pre build, pre configured helicopter, ideally a Coax one because you are not ready for hardcore open source community supported hardware and software like this...


    Hi, after searching around and finding bits and pieces of information on how to set-up a heli with a cc3d.  I offer you a more or less complete recepie on how to set it up.

    For the purpose of this set-up, I am using an Align 450 Sport with a Hobby King flybarless conversion kit.

    The servos are MKS DS92 for the swashplate and a DS95i for the tail.
    The reciever is an Orange RX DSMX satellite reciever connected to the flexi port with a slight mod.  (Picked up 3.3V off the board for the + on the satellite receiver)
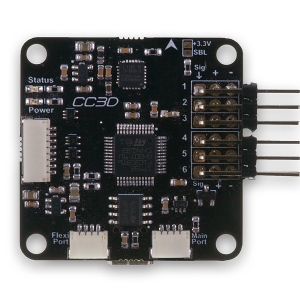
    (Look on the top right of this picture where you can get 3.3V)

    Here are the steps.
    • I found a nice spot on the rear left of the frame at the tail boom height to stick the cc3d in it's case with dampening double sided tape.  I made sure to point the USB port to the back of the helicopter.
    • Connect the cc3d to the computer via usb and launch LibrePilote.
    • Update the board and make sure you are running the latest firmware.  Lots of how to on that...
    • Tell the board how the cc3d is mounted on your frame.  Since mine is 90 to the left pointing forward, I go into Configuration, Attitude, Roll.  Change the value from 0 to 90.  Hit Save, then hit level.  Now if you go to the flight data screen, you should see everything level and the little model should move the same way you move the heli.   If you board is on the right side, I would guess you can put -90 on that setting.
    • Next, tell the board it's going to fly a helicopter.  Under Configuration, vehicle select the helicopter.  Then select CPPM 3 servo 120deg.  Then, here are the settings I put for the channels.  (1 is the back servo, 2 is the left servo, 3 is the right one, 4 is the tail rotor, and 5 is the engine.)  Correction angle is 0, CCPM options is Collective Pass Through
    • Next step is to fry your servos... No, really, you can fry your servos if you do this wrong!  You need to tell the cc3d what is the range of your servos.  If you go beyond the range, you can fry the servos.  My suggestion is the following.  Try to read up on your servos and what is their PWM rate and Range.  I know that my servos are 330Hz PWM and the DS92 are happy starting at 1500 and my DS95i is happy starting at 760 and my Turnigy ESC is PWM 50Hz and happy starting at 1300.  Knowing this, this is what I do 1st.    I go to the Configuration, Output, Bank Channels and set this:  1(1-3) 330Hz PWM, 2(4) 330Hz PWM, 3(4,7-8) 50Hz PWM.  Then in the Min and Max I set Chan 1,2,3 at (Min: 1450, Max: 1550), 4 at (Min: 700, Max: 800), 5 at (Min: 1200, Max: 1300).  Once this is done, I hit save. Then I connect the ESX (MAKE SURE THE 3 Wired to the motor are disconnected...  It would be bad to have the blades spin up...)
    • If everyhing is setup ok, the servos should jump to a setting and then settle there without much noise.  If they are forcing, the settings may not be correct for you.  If everyhing is ok, check the test outputs and move the sliders a little to see if the servos move correctly.
    • Now it's time to break out your swash leveling tool / pitch gauge.  go to the Configuration, vehicule, swashplate leveling tab and start the process.  The neutral should be 0 pitch and a level plate.  Adjust the numbers to get 0 pitch and a level swash.  The Max should be all the way up, level with no binding.  Don't worry about the pitch.  The min should be all the way down, level with no binding.   (I set the pitch at 0 and eye balled the level at 0 pitch, then went to max and eye balled the level, then went to min and eye balled the level.  Once this was all done, I hit finish, took off the blades and re-started the level adjustement with the level tool installed.  Minor tweeks to get the swash level at all positions but the mid, high and low did not move on this adjustement.  Test it out with the verify, and make sure there is no binding. Once you finish, don't forget to hit save.
    • Now it's time to set the tail limits.  Go to outputs, and play with the min and max of the tail to get to both ends of your tail rotor.  I increased the range on the tail from 550 to 800 and set the middle at 650.  Then, hit the test outputs and moved the tail slider till i find the min, max and middle.  (Don't touch the elevator and rolls, you will screw up the level of the swash you just did in the previous step.)  Once you know the numbers for the min, mid and max, uncheck the Test outputs and punch the numbrers in by hand and hit save.
    • Now is a great time to remove the tail blades so your heli has no blades installed.  This way you can setup the ESC.  To do so, check the manual for your esc and try to figure out the min and max.  Then, with the test outputs, set your ESC according to the instructions.    You can do this by disconnecting the Battery.  Then, connect the motor to your ESC.  Then, with the USB still plugged in to your CC3D, punch in your min and max for the throttle.  With my Turnigy, I put 1200 min, 1200 neutral, and 1800 max.  Then I hit save, and checked the test outputs.  Then, slid the output to the max and followed the procedure to adjust the range on my ESC.  Use the slider as you would your throttle on the remote.
    • Now the fun part, getting your remote to connect to the cc3d.  Since I am using a satellite, I need to bind it first to my remote.  To do so, go to System, Settings, HwSettings, DSMxBind and set it to 9 (You may need to put 8 or something else).  Now send the setting to the CC3D with the Up Arrow and unplug the cc3d from the USB and unplug the battery.  Plug back the USB only and notice the Satellite flashing.  Now turn on your radio and set it to bind.  Once it's bound, go back to the DSMxBind setting and put it at 0 and hit the Send button once again.  You can now unplug the USB and re-plug to make sure the bind works.
    • Time to set the radio up.  With the radio bound, set all your output on the radio to straight curves like you would an extreme 3d setup.  As an example, my radio is setup as follows.  Ch1 Throttle, -100 to +100 (With throttle cut switch to -100), Ch2 -100 to +100 Ail, Ch3 -100 to 100 Ele, Ch4 -100 to 100 Rud, Ch5 0 to 100 (6 position switch in 20 increments), Ch6 -100 to 100 Throttle, Ch7,8,9 Pot 1,2,3, Ch10 Trn sw 0 or 100.
    • In the CC3D setup, go to the Inputs , set all your channel type to DSMX (Or what ever you have setup) and start the transmitter setup.  This should be quite easy.


    Guys, I know it's not complete, but I will keep writing as I have more time...[/list]
    « Last Edit: January 03, 2016, 03:15:06 am by soncep »

    soncep

    • *
    • 7
    Re: Setting Up Heli with CC3D from Scratch.
    « Reply #1 on: January 03, 2016, 06:13:18 pm »
    Small Update.  There are 2 bugs(I believe) in the 15.09 firmware I am using that stop me from getting the heli working.

    1st bug is the arm sequence doesn't seem to work.  I tried many combinations and none work...

    2nd bug is the swashplate roll control is reversed.  Pitch works good, yaw works good, roll is reversed both on my remote and in the controllers's software that stabilizes the helicopter.  When I nudge the frame right, the swash tilts to the right.  When I go full right, the swash goes left.

    On this bug, I checked the HITL and everything is good... The sticks move like on my remote, and the horizon is moving correctly.

    Maybe it's time to downgrade to 15.02.02?

    daveapplemotors

    • *
    • 245
    • Helis rule
    Re: Setting Up Heli with CC3D from Scratch.
    « Reply #2 on: January 04, 2016, 03:29:49 am »
    15.09 works for me but yes the channels are different. Use my UAVs if you want a starting point.
    Happy Landings!

    Re: Setting Up Heli with CC3D from Scratch.
    « Reply #3 on: January 04, 2016, 09:18:43 pm »
    Hmmm...   Where did I see someone post about that and say something about reducing the range on something to fix it?

    A good clear documentation of the issue and work around would help in getting Jira (bug tracking) and fix implemented.  :)

    daveapplemotors

    • *
    • 245
    • Helis rule
    Re: Setting Up Heli with CC3D from Scratch.
    « Reply #4 on: January 05, 2016, 03:01:25 am »
    I just saw your bug thing about arming. I am able to arm.

    I use 'pitch aft' and the Throttle Hold. I haven't mapped Low throttle in "Normal" mode low enough, I guess.
    Happy Landings!

    SamSam

    • *
    • 27
    • Quads Helis planes
    Re: Setting Up Heli with CC3D from Scratch.
    « Reply #5 on: January 05, 2016, 03:41:00 am »
    In order to "ARM" your throttle PWM has to be below a certain level. Center all your trims in the transmitter and calibrate it in the ground station. Good starting point is to re-set your model and start all over. Also make sure all the transmitter channel "reversing" set to "normal". you need to select heli program with single servo. do not use any transmitter mixing.

    there are 2 places you can reverse "roll"  Input page  Check the box on Roll Reverse, this way it will change both servo directions. after its done reverse a single "Roll" servo in the output page. you have to repeat this process until you get correct servo direction.  see attached pics..

    Re: Setting Up Heli with CC3D from Scratch.
    « Reply #6 on: February 11, 2016, 02:04:14 pm »
    hi guys i cant even select heli..... my vehicle type selection (the current version only provides functionality for multirotors.fixed-wing aircraft and ground vehicle.............(HEEELLLPPPP)....got 15.9

    suzali

    • *
    • 41
    Re: Setting Up Heli with CC3D from Scratch.
    « Reply #7 on: February 11, 2016, 02:51:27 pm »
    Thats quite normal, there has never been a wizard for helicopter.
    You'll have to build it from scratch and use the tutorial / videos provided.
    Maybe you shoul download a uav file and start working and editing it.
    Don't forget to use a landing gear  ;)
    If you then have further questions be sure to get help here!

    Re: Setting Up Heli with CC3D from Scratch.
    « Reply #8 on: February 12, 2016, 01:31:17 am »
    you nsay on step 5 tell the board its going to fly a heli.... i have heli there but i cant select it

    Re: Setting Up Heli with CC3D from Scratch.
    « Reply #9 on: March 18, 2016, 06:13:46 pm »
    After some inactivity I am trying to add a CC3D Atom to a HK450 with a HK flybarless kit.  I have a Turnigy TGY9 transmitter connected to a Turnigy 8 channel receiver.  I have connected 4x9 gram servos to the Atom to confirm that something is happening.  I did make that happen and so far have not "fryed" any servos.  I have some confusion about setting up my transmitter. Should I set it up for ACRO mode and use LibrePilot to make all the helicopter swashplate conversions, or should I set it to Heli3-1 mode which is the 3 servos at 120 degrees connected to swashplate?  I have seen discussions talking about both possible configurations.  Would appreciate any guidance from anyone with similar configurations.  Lynn, Austin, TX

    daveapplemotors

    • *
    • 245
    • Helis rule
    Re: Setting Up Heli with CC3D from Scratch.
    « Reply #10 on: March 18, 2016, 08:42:02 pm »
    Start with someone's uav file and modify it to fit your equipment.

    You will change :
    Port Settings on the Hardware page in Configuration
    Accel and Gyro settings --  -1 becomes +1 or vice versa on Accel and Gyro Scale.
    Actuator settings --servo travel-- Start with conservative numbers so you don't wreck servos. max 1700, neu, 1522, min 1350
    Manual control settings -- radio outputs for a radio. Or a satellite numbers if you use a sat.
    Rates-- in Stabilization--Be sure that your manual rates are at least 360. I use 540 and 570 total.
    Control Loop (PID) numbers in Stabilization on up to 3 banks for 3 axes for inner and outer loop--lotsa numbers.

    I attached someone else's UAV --HK450, DX6i, radio not sat. No guarantees whatsoever.

    My HK250 / Nano Revolution (think GPS)is connected to my laptop wirelessly with OPlink software and a couple of small 433mHz radios--OPlink Mini Ground and Air. I got help very quickly on this forum after a frustrating couple hours internet search for how to connect OPlink

    And soon I am trying a bluetooth connection to another CC3D board.
    Happy Landings!

    Re: Setting Up Heli with CC3D from Scratch.
    « Reply #11 on: March 18, 2016, 09:49:40 pm »
    Dave, thanks for the quick reply.  Sorry I may sound retarded, but could someone tell me how to download and install a uav file?  I see all the references to them in many discussions.  Lynn, Austin

    daveapplemotors

    • *
    • 245
    • Helis rule
    Re: Setting Up Heli with CC3D from Scratch.
    « Reply #12 on: March 18, 2016, 10:36:43 pm »
    If your computer and heli are connected to the GCS (ground control station) you can import or export files--top left of page.

    Save / Export a from your CC3D to share. I name my files chronologically so that I can find an old one quickly.
    Happy Landings!

    Re: Setting Up Heli with CC3D from Scratch.
    « Reply #13 on: March 20, 2016, 12:35:18 am »
    I know this is basic, but I really need to get my transmitter setup right before I can make any progress on my CC3D setup.  I have a Turnigy 9X transmitter which I have setup for helicopters and various planes.  Eight different models possible.  For the CC3D, should I set it up as an ACRO plane and let LibrePilot do the translation to a flybarless swashplate helicopter, or should I select the HELI1 option?  This is supposedly a single servo option.  When I connect the Atom to my receiver, I assume the six receiver outputs go to the six Atom inputs in order?  Then I go to the Configuration tab and make the Atom inputs have the same function as the receiver outputs?  Does someone have a UAV file that is similar to a Turnigy Transmitter driving a HK450 helicopter?  Seems like I am asking for someone else to do all the work, but after spending hours I do not seem to be making any progress.  Any help much appreciated.  Lynn, Austin

    daveapplemotors

    • *
    • 245
    • Helis rule
    Re: Setting Up Heli with CC3D from Scratch.
    « Reply #14 on: March 20, 2016, 12:52:30 am »
    Hey Lynn

    Single servo heli
    this guy gets 6 flight modes on Turnigy 9x:

    Don't assume that inputs go in order.

    Happy Landings!